Có rất nhiều cách để giải phóng một lượng đáng kể không gian ổ cứng trên một chiếc PC chạy Windows 10, không cần đụng đến các thiết lập có thể ảnh hưởng đến hiệu suất tổng thể của Windows.
Với các thiết lập mặc định, Windows 10 sẽ tự động tải và cài đặt các bản cập nhật khi chúng được phát hành bởi Microsoft. Tính đến thời điểm này, đã có hai bản cập nhật lớn (November Update và Anniversary Update) được phát hành cho Windows 10.
Mỗi khi bạn cài đặt một bản cập nhật lớn cho Windows 10 hoặc nâng cấp lên phiên bản mới nhất của Windows 10, bạn cần phải xóa các file và folder được tạo ra khi cập nhật để lấy lại không gian bị chiếm dụng một cách thủ công. Có lẽ bạn bạn đã biết rằng bạn có thể giải phóng hàng GB không gian trống bằng cách xóa thư mục Windows.old cũng như xóa phiên bản driver cũ của các thiết bị khỏi Windows 10.

Các file tạm cài đặt Windows có thể không hiện diện trên PC của bạn nếu bạn đã từng sử dụng một tiện ích dọn dẹp ổ cứng của bên thứ ba hoặc bạn vừa thực hiện cài mới lại Windows 10.
Xóa các file tạm cài đặt Windows trên Windows 10
Các file tạm cài đặt Windows thường được tạo ra khi bạn nâng cấp Windows 10 lên một bản build lớn mới. Chẳng hạn, các file tạm cài đặt Windows được tạo ra khi bạn nâng cấp lên Windows 10 Anniversary Update.
Lưu ý rằng các file tạm cài đặt Windows hoàn toàn khác với các file tạm. Việc xóa các file tạm từ thư mục Temp sẽ không xóa các file tạm cài đặt Windows.
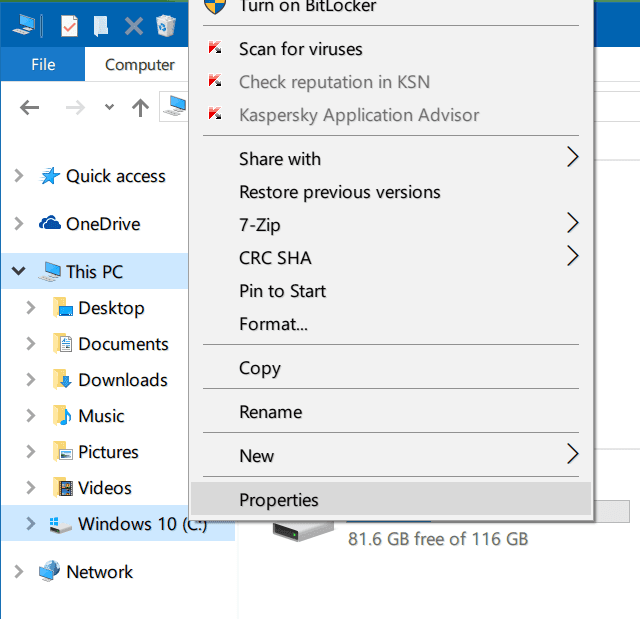
Bước 1: Mở This PC hoặc Quick Access, nhấp chuột phải lên ổ đĩa Windows 10 được cài đặt (thường là ổ C) và chọn Properties.
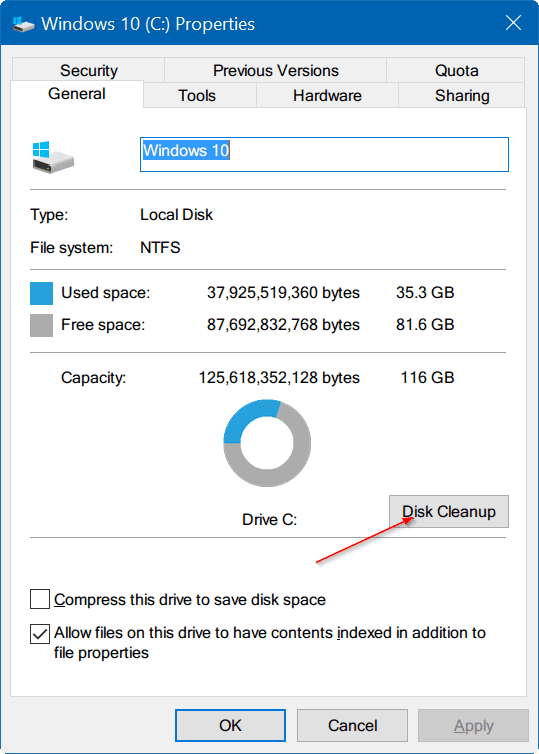
Bước 2: Nhấn nút Disk Cleanup để chạy công cụ Disk Cleanup. Công cụ Disk Cleanup có thể mất khoảng vài phút để hiển thị những file và folder có thể được xóa để giải phóng không gian ổ cứng.
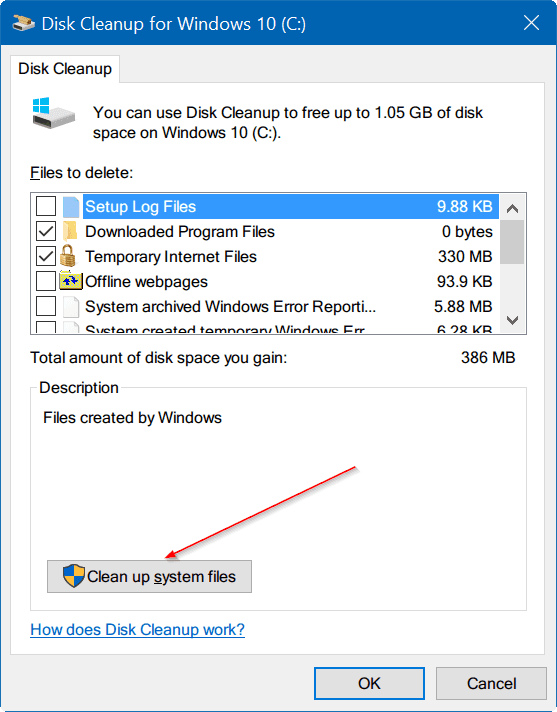
Bước 3: Khi bạn thấy hộp thoại bên dưới, hãy nhấn nút Clean up system files. Lần này, tiện ích Disk Cleanup sẽ tìm các file hệ thống có thể được xóa để lấy lại không gian đĩa.
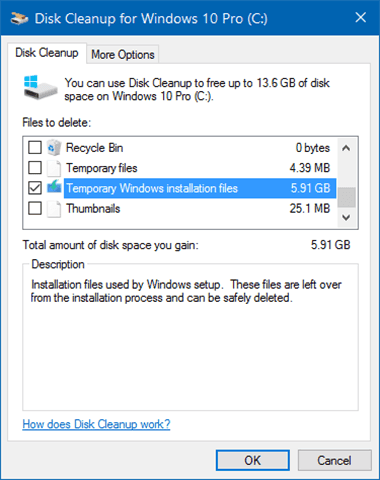
Bước 4: Hãy tìm đến mục có tên Temporary Windows installation files, đánh dấu chọn vào ô vuông trước nó, và sau đó nhấn nút OK. Nhấn nút Yes nếu bạn thấy hộp thoại xác nhận hoặc hộp thoại cảnh báo để tiếp tục xóa các file tạm cài đặt Windows.
]]>